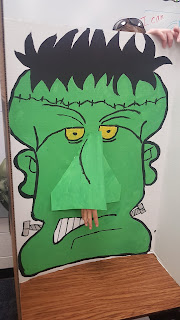
Well I clicked through and there was no tutorial :(. My sister had also pinned this Guy and look for one so I decided to write one up it's really easy and a big hit.
Materials:
Elmer's presentation board (the one's that you use for science fair)
craft paint:
green, black, yellow, white, grey
Paint brushes
card stock
masking tape
Hot Glue
Box cutter
Toys and Slime
You could also use a big piece of cardboard and easel but the presentation board fits perfect on an elementary school desk.
The first thing I did was sketch the Frankenstein on with a pencil that way I would have landmarks to make sure his face was right. At this point you can erase and it will get covered up by paint so don't worry. I was the kid who's mom couldn't tell what her pictures were so you can draw this it's easy. Once you are done I recommend taking pictures of your pencil drawings.
Next I painted in all the green. I accidently bought three different colors of green so I mixed them all together. I didn't really need more than one bottle. I also painted in the grey bolts. I painted in the hair and outlined him in black. You could use a paint marker to do this part if you wanted more control.
Now you will need to let it dry all the way. This to me is the hardest part as I have zero patience. Then the fun step adding all the features in. I pulled out my pictures for the first step for a frame of reference. I pull out my pencil and drew the features back onto Frank. Then I went back in with the rest of the paint and painted in his feature. I used a yellow for the eyes that turned out to light so I had to go back and fix it later. Remember if you mess something up you can simply paint over it and start again.
The next step is to make the nose. I forgot to take pictures of this step but basically you take your green and paint two pieces of card stock and paint them and then cut a curve out of the opposite corners. Something like this:
Once you have them cut out tape them together with masking tape. Paint the tape to match and this will allow you a floppy bridge. Then you can paint the bridge and the nostrils if you want. I only did the bridge and wish I had left this out. Next you want to hold glue the top of the bridge between his. Pinch the bridge while gluing it down. Glue the edges down until you are comfortable it is on there. I did not glue the nostrils on because I thought there was a chance some kids might get wild and tear them off. It's really your call just remember you have to be able to get your hand up there.
The next thing I did was lift up his nose so that I could cut a triangle behind it so I could pass things through. The box knife works great for this. Now he was ready for school.
I bought prizes and fake snot. I thought the kids would be grossed out by the slime but I could have given this away as the prize the kids had a great time. We did the party in stations and had about 10 min each station and I was able to get through 6-7 kids per time to get a prize and then back through to get pictures.
It was a huge hit and could be modified into another character for any other type of party. I hope this helps.


No comments:
Post a Comment